> ## Content Index
> Fetch the complete content index at: https://help.cuedesk.com/llms.txt
> Use this file to discover other available public pages before exploring further.
# Freshdesk Integration Guide
- URL: https://help.cuedesk.com/freshdesk-integration-guide/
- Published: 2025-05-05T16:24:28.000Z
- Updated: 2026-10-29T13:10:03.000Z
- Author: Rhett Trickett
- Tags: Integrations

This guide will cover how to integrate data from your Freshdesk account into flows in Cue.
## Overview
1. [Requirements for Integration](#requirements-for-integration)
2. [Authenticating with the Freshdesk API](#authenticating-with-the-freshdesk-api)
3. [Make API requests to Freshdesk from a Cue flow](#make-api-requests-to-freshdesk-from-a-cue-flow)
4. [Find Freshdesk tickets](#find-freshdesk-tickets)
5. [Create a Freshdesk ticket](#create-a-freshdesk-ticket)
6. [Update or close a Freshdesk ticket](#update-or-close-a-freshdesk-ticket)
7. [Save a Cue conversation transcript to a Freshdesk ticket note](#save-a-cue-conversation-transcript-to-a-freshdesk-ticket-note)
## Requirements for Integration
You'll need the following in order to set up this integration:
1. a Freshdesk API Key
2. your Freshdesk domain (e.g. `yourcompany.freshdesk.com`)
3. access to Flows in your Cue workspace (e.g. the Admin role)
## Authenticating with the Freshdesk API
The section will cover how you can get an API key for your Freshdesk account and use it to authenticate API requests made from your flow in Cue.
### Get your Freshdesk API key
To get an API key for your Freshdesk account you'll need to be a Freshdesk Admin and do the following:
1. Log in to your Freshdesk account
2. Click on your profile picture on the top right corner
3. Go to **Profile settings**
4. Your API key will be visible below the change password section on the right
See the official [Freshdesk API Authentication docs](https://developers.freshdesk.com/api/?ref=help.cuedesk.com#authentication) for more info, if needed.
### Authenticating Freshdesk API requests
Once you have your Freshdesk API key you can store it as an encrypted *secret* within with your flow and then use it when making HTTP Requests in your flow.
#### Add the Freshdesk API key to your flow
1. Open your flow
2. Click the **⋮** icon in the top right corner of your screen and select **Secrets**
3. Click **Add secret**
4. In the **Key** field give your secret a name (e.g. `API_KEY`)
5. In the corresponding 'Value' field paste in your Freshdesk API key
6. Click **Save**
This saves your Freshdesk API key in an encrypted format and now allows you to use it in HTTP requests by typing `{{secrets.API_KEY}}` (or whatever you've named your key). When the HTTP step is executed, the above placeholder will be replaced with the actual API key you saved as a secret.
#### Use the Freshdesk API key secret in an HTTP Request
To use your Freshdesk API key secret in an HTTP Request you can do the following:
1. Create an HTTP Request step in your flow and click on it to open the step settings panel.
2. Expand the **Authorization** section and select **Basic Auth** from the drop-down.
3. In the **Username** field put `{{secrets.API_KEY}}`
4. In the **Password** field you can put any value, for example `x`. Freshdesk only looks at the username value for your API key.
5. Set the remaining details for your HTTP request such as method, url, body etc and save the changes.
Now your HTTP step will use your Freshdesk API key to make authenticated requests to your Freshdesk account using the Basic Authentication process.
## Make API requests to Freshdesk from a Cue flow
Once you've got your Freshdesk API key [saved as a secret](#add-the-freshdesk-api-key-to-your-flow) in your flow you can [use it to make API requests](#use-the-freshdesk-secret-api-key-in-an-http-request) to Freshdesk API endpoints. Let's take a look at a few examples of what you can do with the Freshdesk API now.
## Find Freshdesk tickets
### Get a single ticket
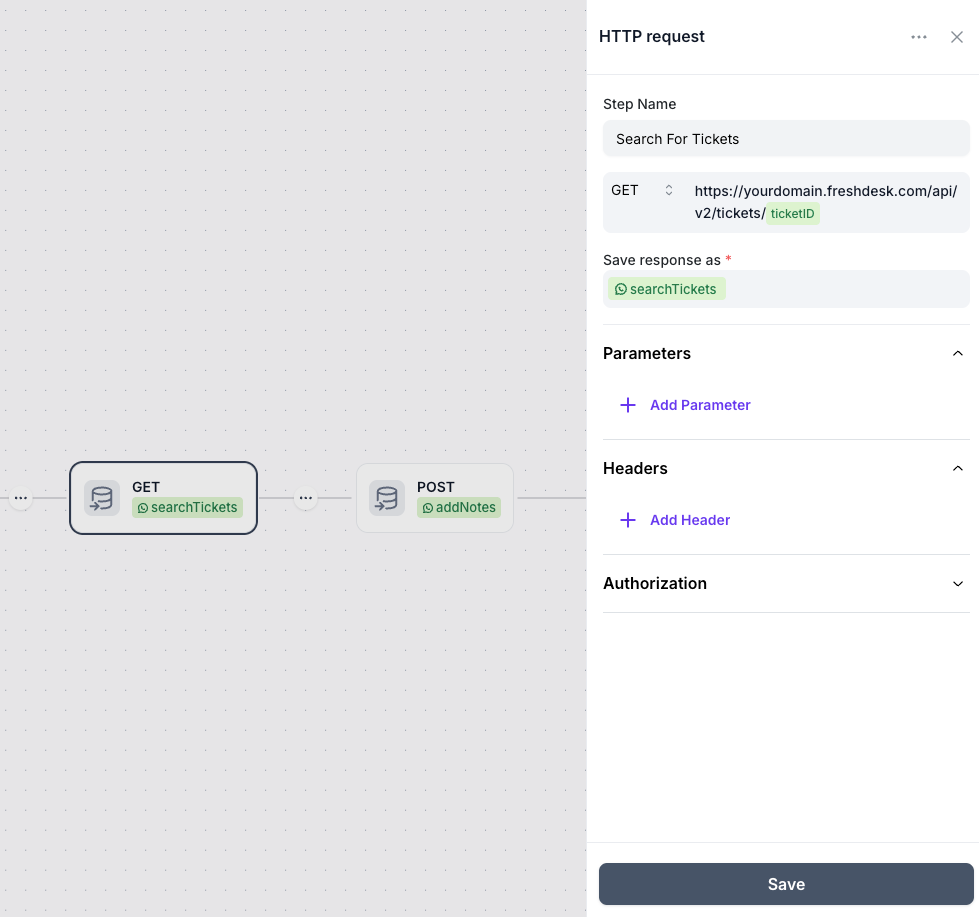
Below is an example of how you can get details for a specific ticket from Freshdesk. Make a POST request to the following URL.
`https://yourdomain.freshdesk.com/api/v2/tickets/[ticket_id]`
### Get a list of tickets
If you want to list all tickets you can make a GET request to the following URL:
`https://yourdomain.freshdesk.com/api/v2/tickets`
See [Freshdesk's List Tickets API](https://developers.freshdesk.com/api/?ref=help.cuedesk.com#list%5Fall%5Ftickets) docs for more detail.
## Create a Freshdesk ticket
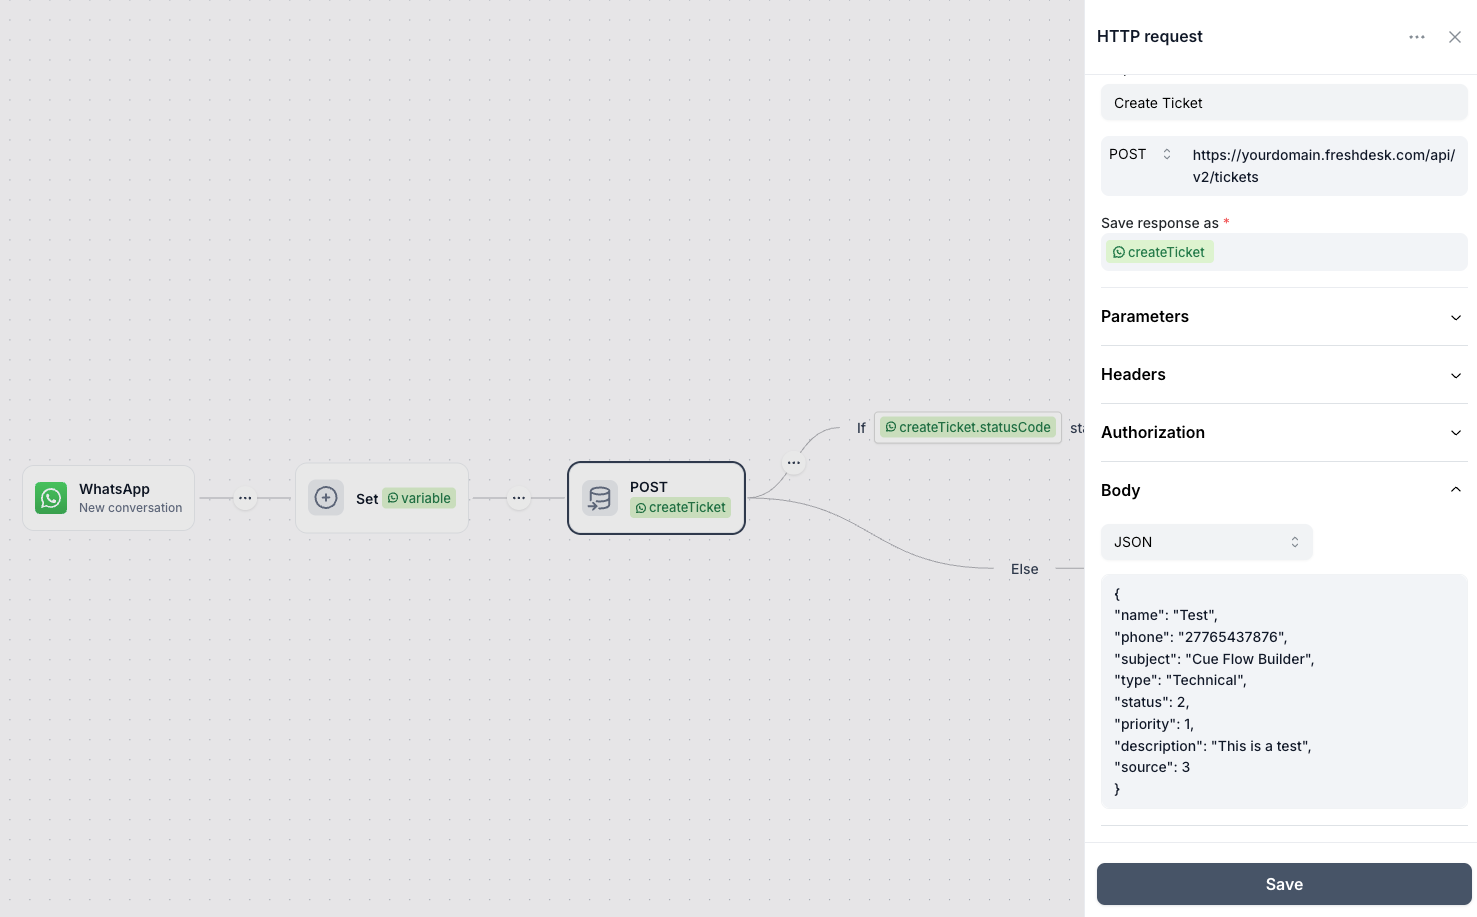
To create a ticket, make a POST request to: `https://yourdomain.freshdesk.com/api/v2/tickets`
You must include at least one of the following properties in your request body to indicate who created the ticket: `requester_id`, `email`, `facebook_id`, `phone`, `twitter_id`, `unique_external_id`.
See [Freshdesk Create Ticket API docs](https://developers.freshdesk.com/api/?ref=help.cuedesk.com#create%5Fticket) for more detail on what fields you can include. Below is a screenshot of an example request to create a ticket in a flow. Remember to include your API key under the Authorization tab.
If your request is successful you can extract the `ticket_id` from the response to your request.
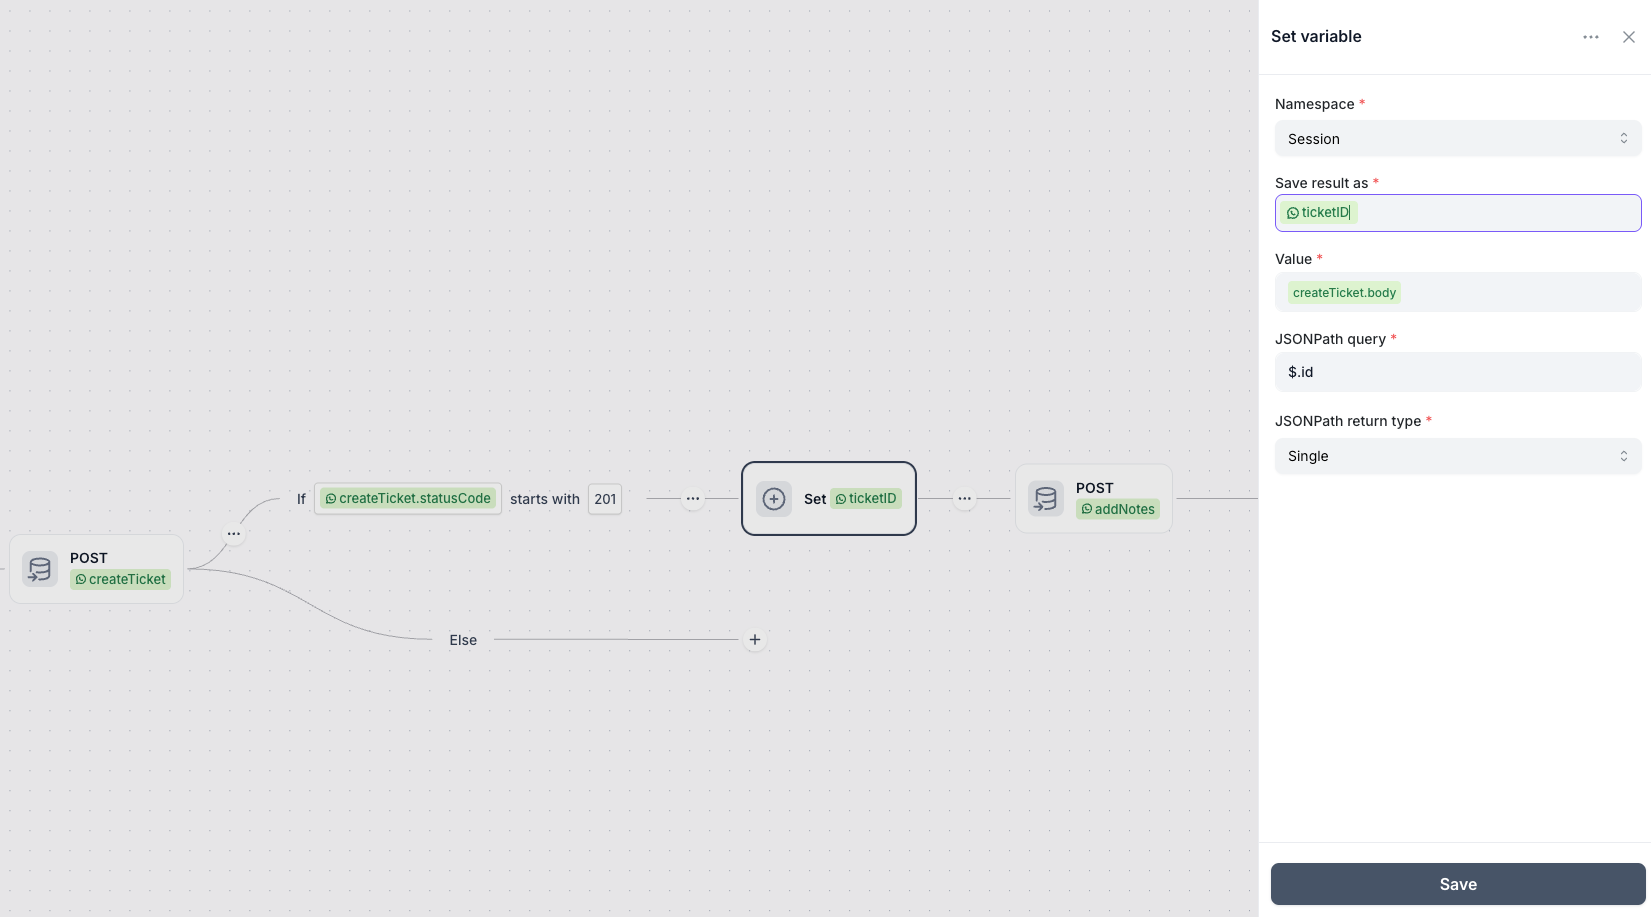
The ticketID variable can now be used anywhere within the flow
## Update or close a Freshdesk ticket
To update or close a ticket make a PUT request to:
`https://yourdomain.freshdesk.com/api/v2/tickets/[ticket_id]`
See [Freshdesk Update Ticket API docs](https://developers.freshdesk.com/api/?ref=help.cuedesk.com#create%5Fticket) for more detail on what properties you can use in your request. For example, you may want to set the `status` field of a ticket to `4` to mark it as resolved or `5` to mark it as closed (e.g. customer confirmed resolved).
## Save a Cue conversation transcript to a Freshdesk ticket note
If you want to save a Cue conversation transcript to a Freshdesk ticket in you can add a note to a ticket by making a POST request to the following endpoint:
`https://yourdomain.freshdesk.com/api/v2/tickets/[ticket_id]/notes`
You can use the [conversation.plainText](https://help.cuedesk.com/syncing-conversation-history-with-crms/#push-conversation-history-from-a-flow) property in flows to produce an entire transcript of the conversation that can be passed into the `body` property of the note request body. However, there is a known issue that requires a workaround that is discussed below.
The `body` field in the Freshdesk Create Note API requires HTML but does not like the `\n` characters included in `conversation.plainText` text that gets rendered. To get around this you will need to first pass `conversations.plainText` into a [function step](https://help.cuedesk.com/using-functions-in-flows/) and replace all `\n` characters with `
`
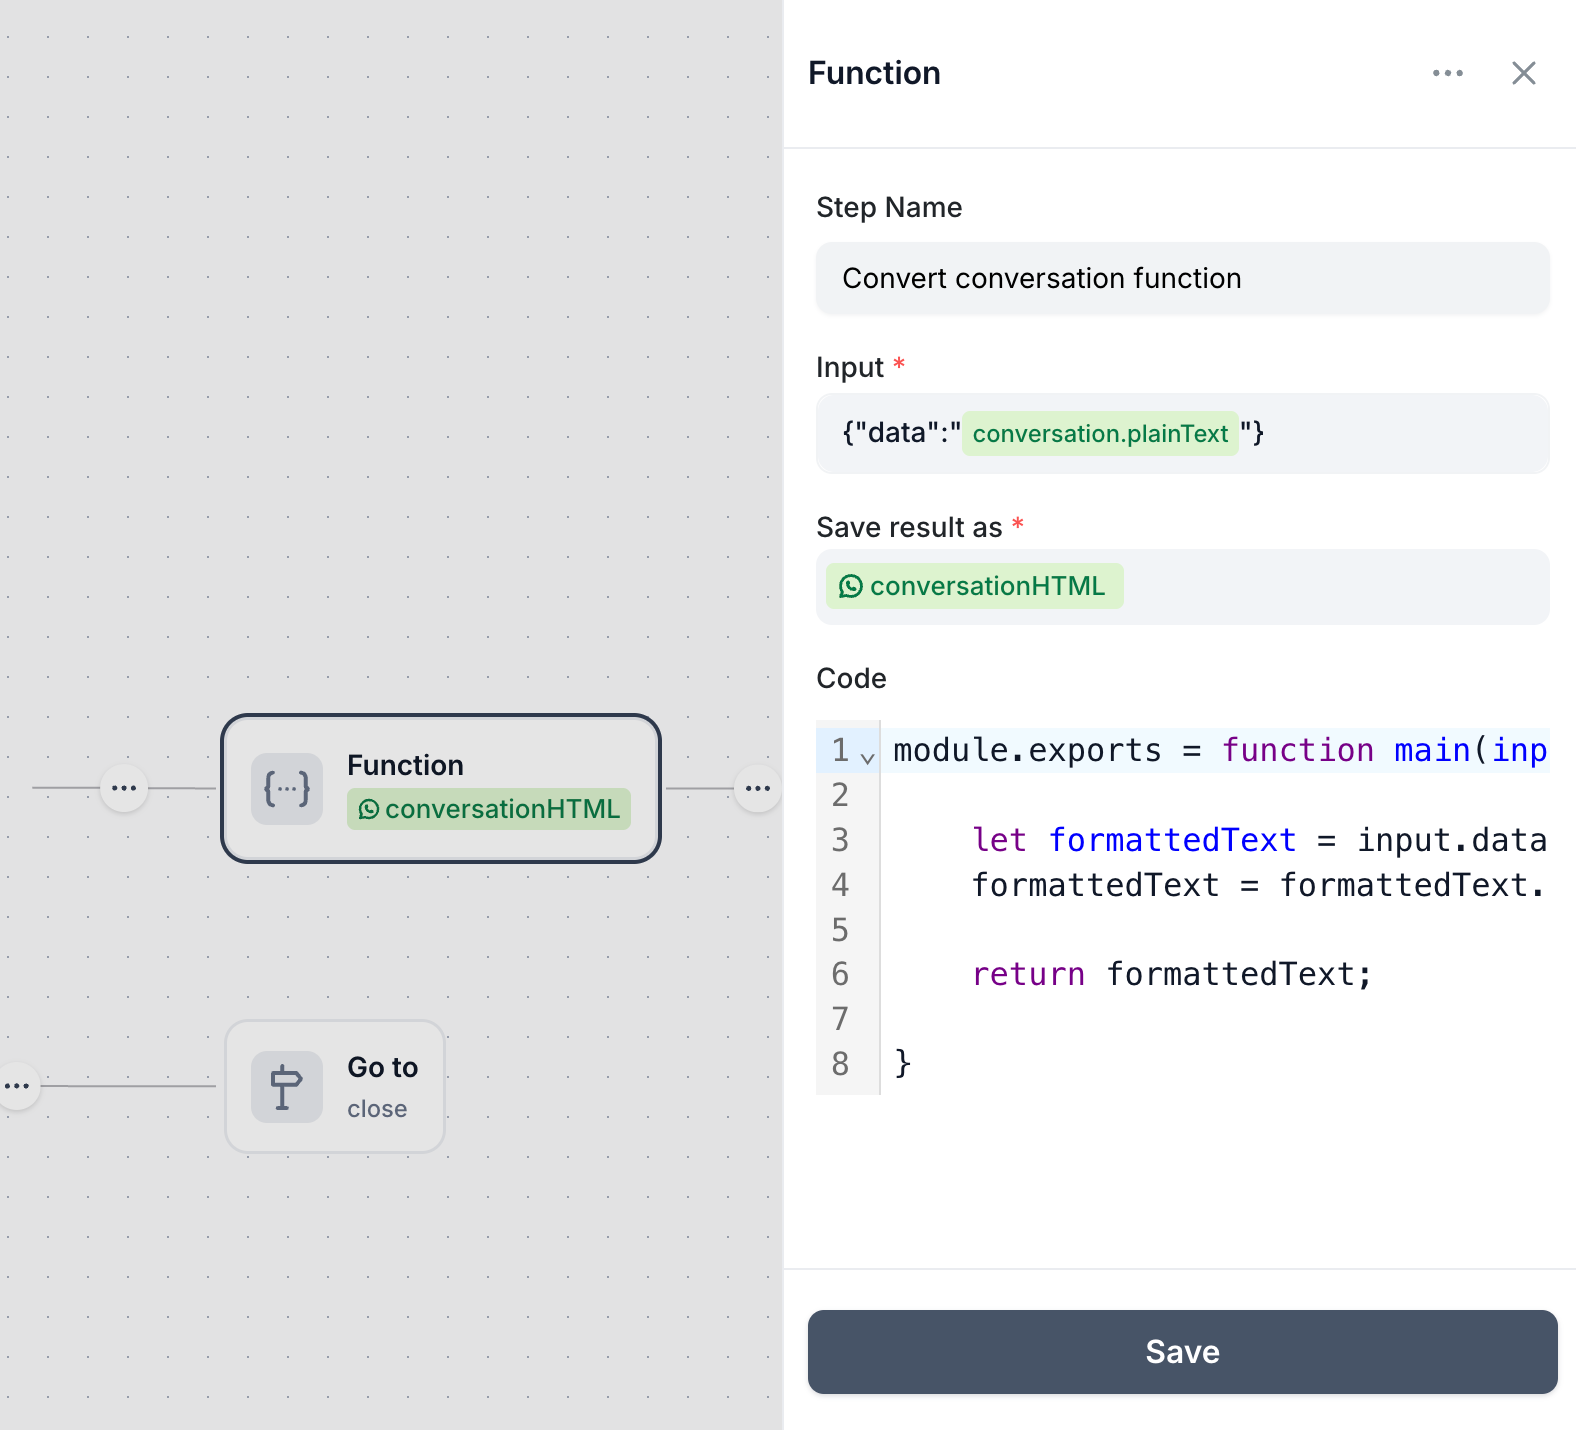
Below is an example of the Function step you can create to replace the newline charactesrs in the conversation.plainText output.
#### Function to replace newline characters
Start by creating a new Function step and adding the following into the **Input** field. Make sure to press `{` to bring up the property autocomplete and use it to insert `conversation.plainText` between the two double quote marks.
```json
{"data":"conversation.plainText"}
```
In the **Save result as** field you can specify the name for the property that stores the result of this function once executed. For example you could make this value `conversationHtml`.
In the **Code** field, paste in the following code.
```javascript
module.exports = function main(input) {
let formattedText = input.data.trim();
formattedText = formattedText.replace(/\n/g, "
");
return formattedText;
}
```
Below is a screenshot of what this step should look like:
Finally, when you make your request you can insert `conversationHtml.output` into the `body` property of your request body. Press `{` to bring up the property autocomplete when editing your request body.
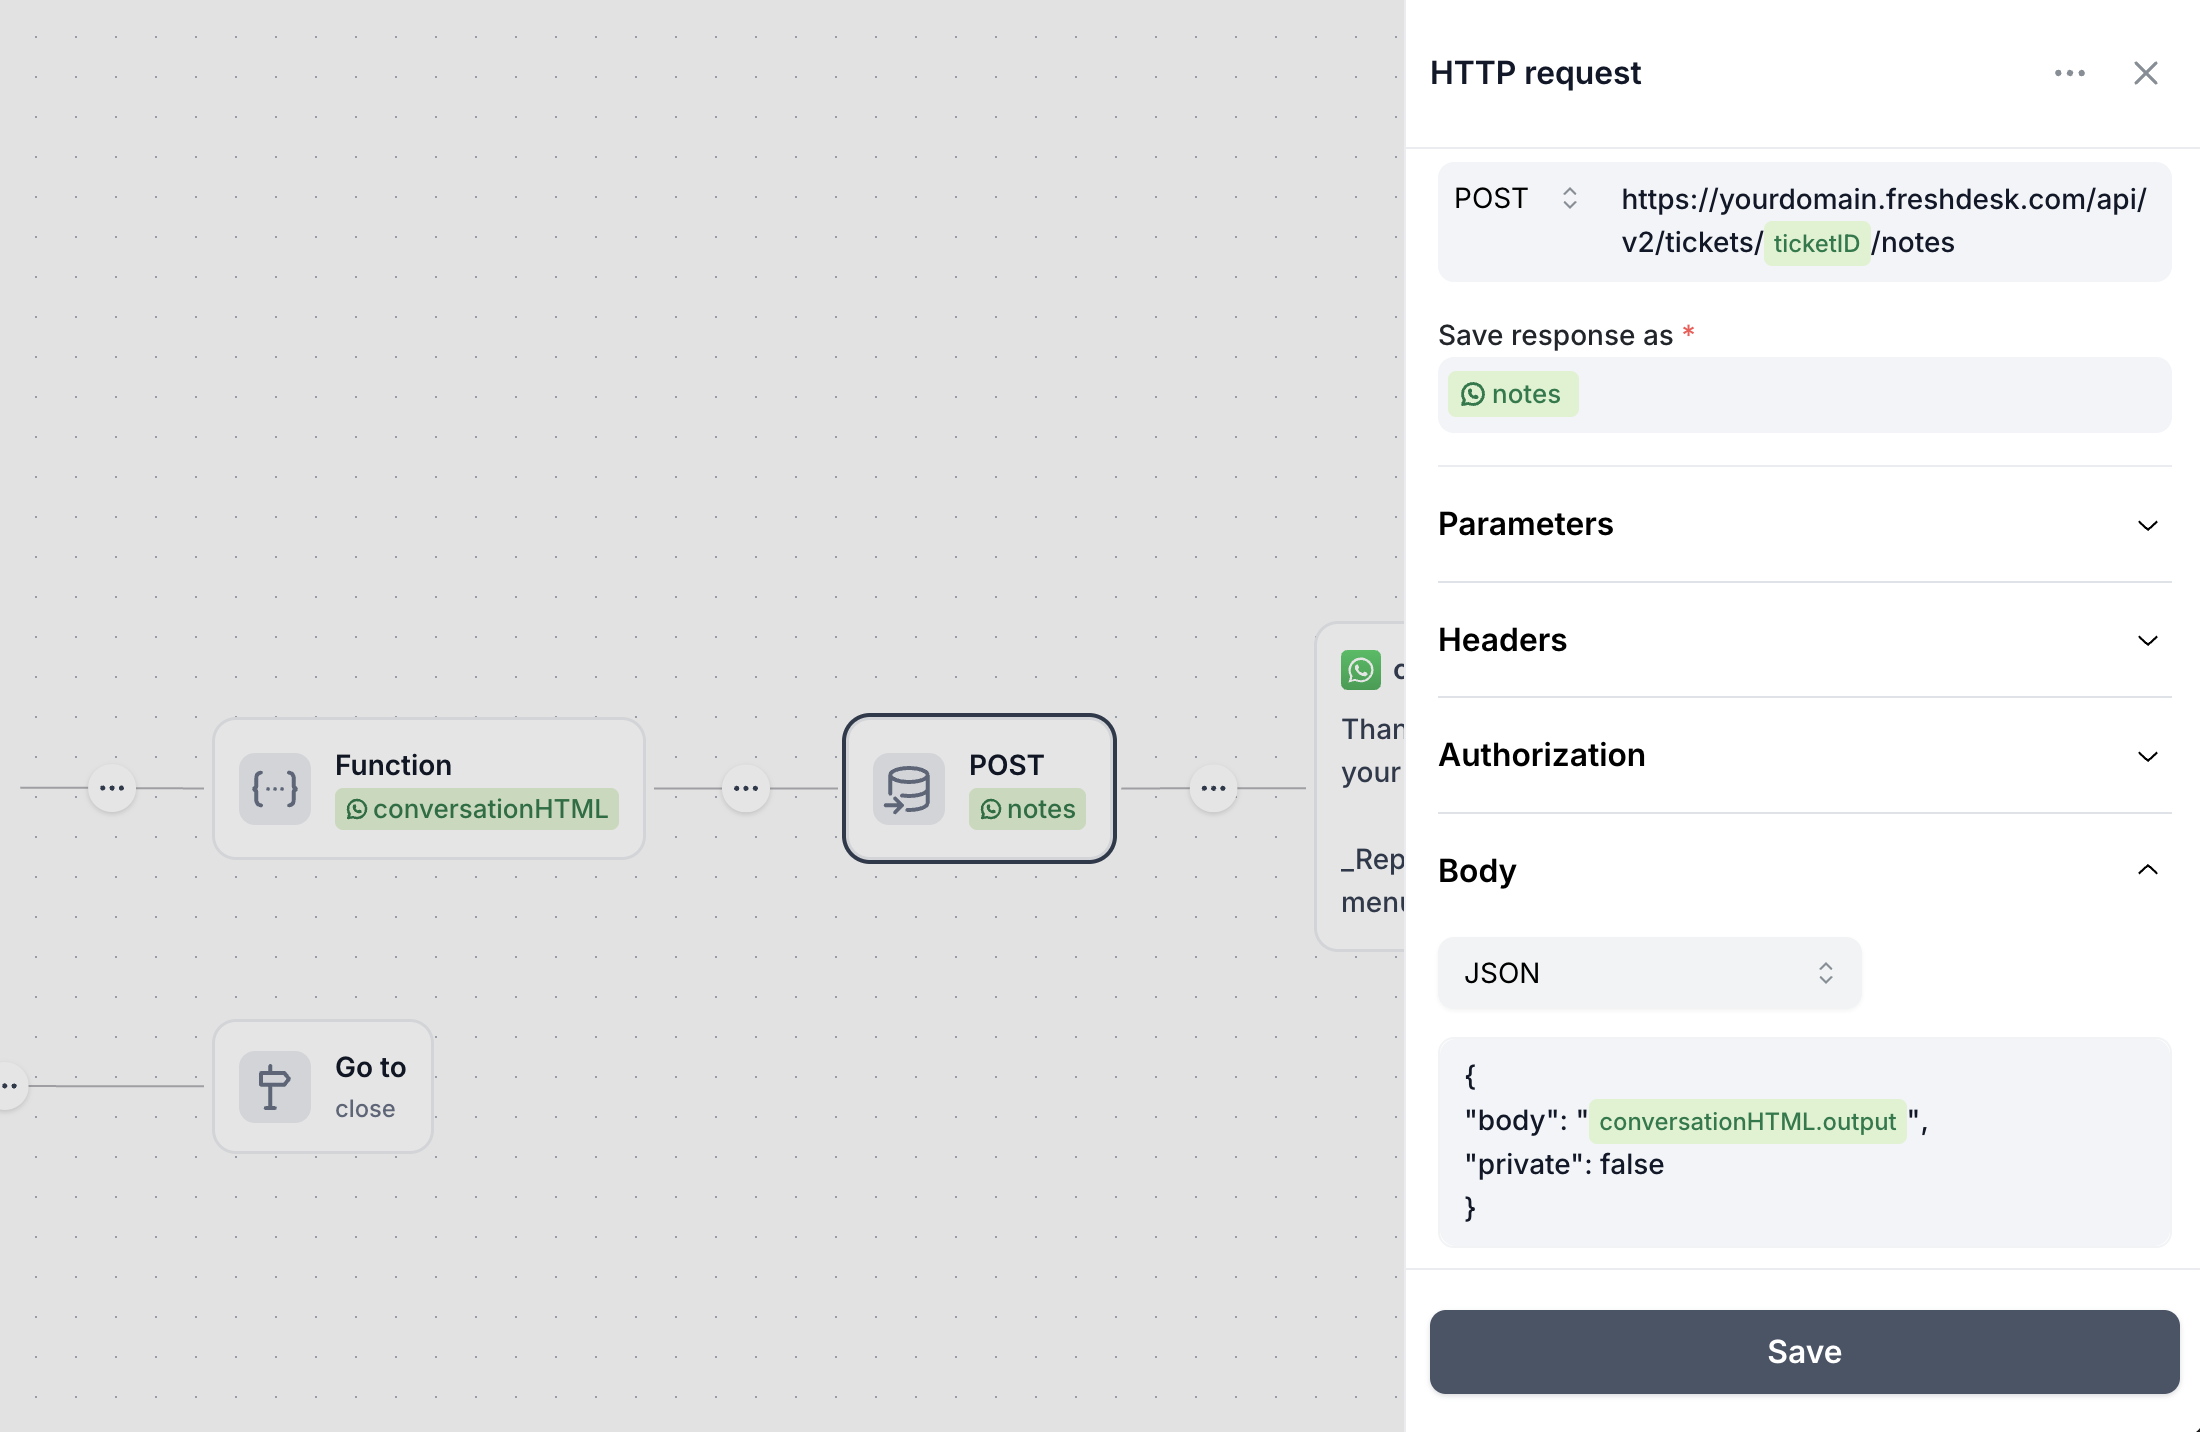
See [Freshdesk Update Ticket API docs](https://developers.freshdesk.com/api/?ref=help.cuedesk.com#update%5Fticket) for more detail on what properties you can use in your request.